It started with a listing on eBay. Honestly, I hesitated. My "To-Repair" pile is already tall enough to be a structural hazard, and the new Tuff Shed I hauled home from Home Depot is running out of floor space. But the photos showed a pristine screen and decent cosmetics. I gambled on the "sat for years, might just work" theory and hit 'Buy It Now.' After it arrived, it sat for a few more days while I finished up a NEC 4000C, then I finally cleared the workbench to see what I had.
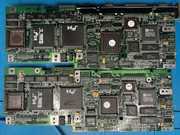
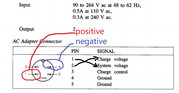
Documentation for these is surprisingly decent online—I even found the pinout for the power jack (! foreshadowing intensifies). I hooked up some Dupont wires to a 20V supply, hit the switch, and... nothing. No surprise there. I resigned myself to a full teardown. For those who haven't opened one: it’s typical early-90s construction. Remove every visible screw on the back and sides, pop the covers, remove more screws, pull the keyboard, pull the display, and keep digging until the motherboard is free.
However, as soon as I lifted the keyboard, I felt a chill. I grabbed my Dyson and kept it at arm's length. By the time I got the display and status panel off, I had put on two face masks and a pair of rubber gloves.
Bugs. So many bugs. I’ve found spiders and "organic hitchhikers" in ThinkPads before, but this was on another level. It was a literal Zerg rush. Under the power sub-board, around the HDD, in every crevice of the motherboard... I’ve probably killed more Zergs in this machine than I have in all my years of playing Starcraft. I’ve attached a photo of a "localized area" below. WARNING: If you have trypophobia or a weak stomach, do not click. bugs.....
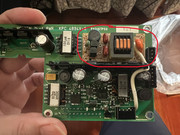
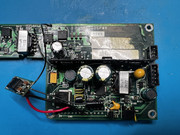
I spent two full days cleaning the chassis and giving the boards multiple IPA baths. It wasn't just for the machine; I needed the time to talk myself out of calling a therapist—only the thought of the medical bill kept me going. On the bright side, a bug infestation usually means the machine wasn't used much, so the silicon was likely healthy. Indeed, the motherboard was nearly perfect except for some minor corrosion. The power sub-board was the real headache. Like many early 90s machines, the massive Ni-Cd CMOS/standby batteries had leaked, creating a corrosive mess alongside a bunch of dried-out electrolytics.
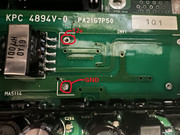
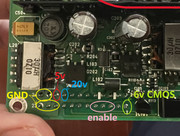
I spent another day recapping everything and jumping broken traces. Hooked it back up: 20V and 5V were present on the board. The CMOS battery rails were wonky (4.8V/6V), but that’s secondary. I checked pins 15/16 on CN16--got my 5V. Shorted them to simulate the power button and... crickets. The power draw curve on my bench supply was a flat line. Zero pulse.
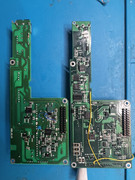
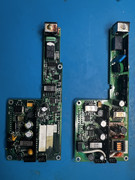
The next two days were a blur of frustration. Given the "Sunk Cost," I wasn't ready to quit, so I impulse-bought a Zenith MastersPort on eBay as a donor/reference. When it arrived, I went through the same ritual: teardown, clean, recap. And yet—the same result. No power. I compared the two sub-boards; the IBM is clearly a revised Zenith design. The IBM offloads the CCFL inverter to the display assembly, while the Zenith outputs high-voltage AC directly from the power board. Otherwise, they seemed interchangeable for testing. I swapped parts back and forth, but the "Dead on Arrival" status remained. I was stuck in a dead end.
I focused on the Zenith board since it looked cleaner. Then, I went back to the IBM board and noticed something odd. The RAM VCC was only 0.9V, and pin 18 on CN5 was being pulled low. I checked my notes and realized I had been ignoring the battery positive terminal, which connects directly to the power input rail. It hit me: The power pinout I found online was wrong. I wasn't actually powering the main rail; I was seeing "leakage" voltage that collapsed under any real load.
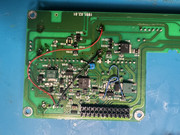
I re-verified the pins, applied 20V to the actual VCC, and, SUCCESS! The screen lit up, followed immediately by a password prompt. Thankfully, these old Zeniths are simple: shorting two pins near the 80387 socket during a power cycle wiped it clean. I tested the Zenith board too, it worked perfectly. All that headache because of a bad diagram on the internet.
Everything seemed to be going my way. I thought I’d have two working vintage laptops by morning. But the universe had other plans. It was late night of April 1st, I had just finished my dailies in Genshin Impact, Then about 1:40 AM, when I was sitting at the bench doing some final work...
Then the earthquake hit.
The whole house started swaying without warning. My phone screamed with a ShakeAlert: Magnitude 5.1 (later corrected to 4.6), epicenter just 12 miles from my seat. My multimeter probe slipped and poked something on the board. I froze for two seconds, brain-dead, just wondering "Is this it?" Once the shaking stopped, I checked the kids and my wife--they did not even wake up. I figured the fault line (Monta Vista Fault or Zayante fault I assume) didn't have enough energy for a sequel, so I tossed my tools aside and went to bed.
The next morning: The Zenith wouldn't boot. The power board is fine, but the motherboard is toast. It powers on to a backlit screen with no POST, even though my thermal cam shows the CPU and GPU are heating up. I was devastated. I fought the urge to throw the whole lot into the bin.
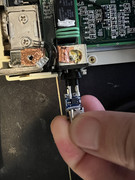
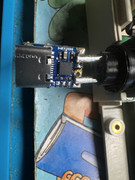
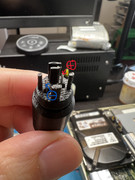
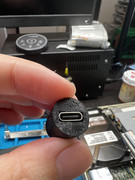
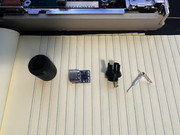
I decided to at least make the IBM "perfect." I modified the Zenith power board (which was in better shape) to work in the IBM. I bypassed the internal inverter, jumped 12V to the center pins of the CCFL header for the IBM's display-side inverter, replaced the HDD, and swapped in a fresh CMOS battery. For the power jack, I skipped the hunt for a proprietary brick and used a PD USB-C trigger set to 20V with two male pin terminals. I 3D printed a custom housing for the plug (don't try an S-Video cable, it won't fit).

As for the battery pack? After all this drama, I don't have the heart to rebuild it yet. I need a vacation to heal my "bug-scarred" soul and recover from the earthquake trauma. I think I'm done with IBMs for a while.
The 3D files are in the attached folder--absolutely no watermarks, enjoy.
https://drive.google.com/drive/folders/ ... JDhib0r0rP
[will update more details]